Dec 24, 2008

Network Failover

Failover is the process of switching to a backup component, element, or operation while recovery from a disruption is undertaken. Failover procedures determine the continuity of a network operation. Failover mechanisms can be devised so that they take place immediately or shortly after a disruption occurs. Many systems use automatic failover and data replication for instant recovery. Preemptive failover can also be used if an imminent disruption is detected.Failover requires the availability of a backup system to eventually take overservice. The type of failover model required dictates the backup state of readiness(Figure 2.2). There are three basic types of failover model. Each has implications onthe amount of information that must be available to the backup system at the time of failover:
• Hot or immediate failover requires a running duplicate of the production system as a backup to provide immediate recovery. Consequently, it is the more complex end expensive to implement. The backup system, referred to as a hot standby, must constantly be updated with current state information about the activity of the primary system, so that it is ready to take over operation quickly when needed. This is why this type of failover is sometimes referred to as a
stateful failover. Applications residing on the backup system must be designed to use this state information when activated. For these reasons, hot standby systems are often identical to the primary system. They are sometimes designed to load share with the primary system, processing a portion of the live traffic.
• Cold failover, on the other hand, is the least complex to implement but likely results in some disruption until the backup is able to initiate service. A cold standby backup element will maintain no information about the state of the primary system and must begin processing as if it were a new system. The backup must be initialized upon failover, consuming additional time. For these reasons, a cold failover model is usually the least expensive to implement.
• Warm failover uses a backup system that is not provided with state information on the primary system until a failover takes place. Although the backup may already be initialized, configuration of the backup with the information may be required, adding time to the failover process. In some variants of this model, the standby can perform other types of tasks until it is required to take over the primary system’s responsibilities. This model is less expensive than
the hot standby model because it reduces standby costs and may not necessarily require a backup system identical to the primary system
Dec 3, 2008

Checking Load of server in Frequent intervals

One of the major problem in linux server is rising of load to high. This can be happened due to various reason. This script will check the load of machine in frequent intervals and inform the administrator through email. This will also send the current server status.


#mkdir -p /opt/scripts
#cd /opt/scripts
#touch server_load.sh
#chmod 755 server_load.sh

Copy paste the following into the server_load.sh

#!/bin/bash
EMAIL="yourname@yourdomain.com"
SUBJECT="Alert $(hostname) load average is $L05"
TEMPFILE="/tmp/$(hostname)"
echo "Load average Crossed allowed limit." >> $TEMPFILE
echo "Hostname: $(hostname)" >> $TEMPFILE
echo "Local Date & Time : $(date)" >> $TEMPFILE
echo "| Uptime status: |" >> $TEMPFILE
echo "-----------------------------------------------------" >> $TEMPFILE
/usr/bin/uptime >> $TEMPFILE
echo "-----------------------------------------------------" >> $TEMPFILE
echo "| Top 20 CPU consuming processes: |" >> $TEMPFILE
ps aux | head -1 >> $TEMPFILE
ps aux --no-headers | sort -rn | head -20 >> $TEMPFILE
echo "| Top 10 memory-consuming processes: |" >> $TEMPFILE
ps aux --no-headers| sort -rn | head >> $TEMPFILE
echo "----------------------------------------------------" >> $TEMPFILE
echo "| Memory and Swap status: |" >> $TEMPFILE
/usr/bin/free -m >> $TEMPFILE
echo "----------------------------------------------------" >> $TEMPFILE
echo "| Active network connection: |" >> $TEMPFILE
echo "----------------------------------------------------" >> $TEMPFILE
/bin/netstat -tnup | grep ESTA >> $TEMPFILE
echo "----------------------------------------------------" >> $TEMPFILE
echo "| Disk Space information: |" >> $TEMPFILE
echo "----------------------------------------------------" >> $TEMPFILE
/bin/df -h >> $TEMPFILE
echo "-----------------THE END----------------------------" >> $TEMPFILE

#Store the Current Load into a variable
L05="$(uptime|awk '{print $(NF-2)}'|cut -d. -f1)"

#Checking whether it goes beyond the limit

if test $L05 -gt 0
then
mail -s "$SUBJECT $L05" "$EMAIL" < $TEMPFILE fi #Remove the Temporary file.
rm -f $TEMPFILE

Create CronJob for this
#vi /etc/crontab
#The following script will run in every minute.
*/1 * * * * root /opt/scripts/server_load.sh

Dec 1, 2008

Block Bad Bots using htaccess

Bots are software applications that run automated tasks over the Internet. But there is some bad bots which will run on your web root and pass your information to outside public. This should be prevented. In this article I am stating how to search for a bad bot and prevent it.

Enable the htaccess as described in the previous post

Open the htaccess

vi .htaccess

RewriteEngine on
RewriteCond %{HTTP_USER_AGENT} ^BadBot [OR]
RewriteCond %{HTTP_USER_AGENT} ^EvilScraper [OR]
RewriteCond %{HTTP_USER_AGENT} ^FakeUser
RewriteRule ^(.*)$ http://go.away/

Save and exit
So, what does this code do? It's simple: the above lines tell your webserver to check for any bot whose user-agent string starts with "BadBot". When it sees a bot that matches, it redirects them to a non-existent site called "go.away". And
also it will check for 3 types of bots and if found one among them the control will be directed to some site.

Prevent access from an IP address using .htaccess

htaccess is a powerful tool is used to manipulated the webroot and apache configurations as well. The Rewrite rules can be written in .htaccess file. .htaccess file normally located in the webroot.

#Open the Apache configuration file.

vi /etc/httpd/conf/httpd.conf (Redhat Based,Centos Distros)
vi /etc/apache2/apache2.conf (Debian Based,Ubuntu Distros)

# Uncomment the Following Line

LoadModule rewrite_module modules/mod_rewrite.so

we need to change the AllowOverride directive also from


Options FollowSymLinks
AllowOverride None
Order deny,allow
Deny from all
Satisfy all


to


Options FollowSymLinks
AllowOverride All
Order deny,allow
Deny from all
Satisfy all


Perfect !!! You have enabled the .htaccess support in your apache webserver.

Now go to your webroot. Normally its /var/www/html/domain.com. Create an htaccess file

touch .htaccess

vi .htaccess

Copy paste the following in to .htaccess file

order allow,deny
deny from 123.45.6.7
deny from 012.34.5.
allow from all

Save And Exit

Viola !!! You have blocked the above IPs from watching your site. Same like you can restrict an IP range also. Do the following if you would like to block a range

order allow,deny
deny from 123.45.6
deny from 012.34.
allow from all

You can block an ISP through the above method. Changes will look like following

order allow,deny
deny from some-evil-isp.com
deny from subdomain.another-evil-isp.com
allow from all

The above will all traffic from the specified Internet Service Providers IPs

Oct 23, 2008

How your Linux Boots ?

This is the Normal boot process of a Linux Operating System in to your computer. Boot process takes place in 4 scenes with 4 main characters.

Scene 1
when the computer is switched on,it automatically invokes BIOS[a ROM chip embedded in the motherboard].The BIOS will start the processor and perform a POST[power on self test] to check whether the connected device are ready to use and are working properly. Once the POST is completes BIOS will jump to a specified location in the RAM and check for the booting device.The boot sector is always the first sector of the hard disk and BIOS will load the MBR into the memory.

Scene 2
Here the boot loader takes the control of the booting process.LILO or GRUB are the boot loaders commonly available. It will help the user to select various boot options.Depending on the boot option selected the kernel is loaded.

scene 3

After kernel is loaded the kernel will take the control of the booting process and it will initialize all the hardwares including I/O processors etc.kernel then creates a root device and mounts the partitions.

Scene 4
INIT is loaded

Oct 15, 2008

Encrypt the Mail Attachment.

Now a days internet is considered to be the most unsecured area of data transfer. Most people will send emails with attachment of their confidential matters,agreements etc. Anybody can read once you hack the email. But if attach with an encrypted key,you can open only with the help of a password,which you give at the time of encryption. I am briefing,how to encrypt a file.

Infrastructure

OS: Ubuntu 8.04
Application : gpgv

#gpg -c

This time it will ask for the password twice,give it. And you are done. Now you can
see a filename called Filename.gpg. You can send it through internet comfortably.

For Decrypting do the following

#gpg Filename.gpg

Again it will ask for the password. Give ,OK file is decrypted.

Oct 10, 2008

Restart APACHE Safely

In all the Unix like machines ,there is an INIT script running for APACHE. Normally it is located in /etc/init.d/httpd (In case of REDHAT based systems). But in Debian based systems it could be /etc/init.d/apache2. For restarting we use the following

#/etc/init.d/httpd restart (Redhat Based Systems)

OR

#/etc/init.d/apache2 restart (Debian Based Systems)


While doing this command,it will KILL all the listening processes in the machine and stopping and starting Apache. But the problem is while applying the command CLIENTS will losts its all the established connections and result may be an error.


There is a wonderful command is in Apache for preventing this,the command is APACHECTL. Normally called Apache Control. Before restarting apache think once and apply the following


#apachectl -k graceful

The impact is Apache will serve all the established requests to the server. Then only it go for RE-start. User wont have a feelings of this COLD restart.

What is GLUE Record

A glue record is an A record that is created as part of a delegation. If a zone is delegated to a name server whose hostname is a Descendant of that particular zone, then a glue record for that hostname must be included in the delegation.

Sep 24, 2008

How to Find APACHE under Attack

Apache is the worlds largest using WEB SERVER. According to netcraft survey 49.73% of the market is owned by this wonderful product. This was free under GPL. The attackers are trying to hack the websites,whichever may be the server. So a Web Administrator should be vigilant about his Apache server.

Here I would like to tell how an administrator find whether his Apache server is Under Attack.

1.First checkout the load of the server

top -u apache (Here apache means the web server user)

Tasks: 126 total, 1 running, 125 sleeping, 0 stopped, 0 zombie
Cpu(s): 3.8%us, 0.7%sy, 0.0%ni, 94.3%id, 1.1%wa, 0.0%hi, 0.0%si, 0.0%st
Mem: 1027224k total, 927296k used, 99928k free, 46428k buffers
Swap: 3004112k total, 0k used, 3004112k free, 410736k cached

PID USER PR NI VIRT RES SHR S %CPU %MEM TIME+ COMMAND
5573 apache 20 0 20696 3284 584 S 0 0.3 0:00.00 apache2
5575 apache 20 0 20696 3284 584 S 0 0.3 0:00.00 apache2
5576 apache 20 0 20696 3284 584 S 0 0.3 0:00.00 apache2
5577 apache 20 0 20696 3284 584 S 0 0.3 0:00.00 apache2
5578 apache 20 0 20696 3284 584 S 0 0.3 0:00.00 apache2

This is the normal stage of Apache. If the CPU usage is increasing,take care you are in trouble

2.Check the number of running Apache processes

ps -ef | grep apache | wc -l

If you get a number below 50,no problem. Other wise something nasty is happening

3.Check how many listening connection to port 80

ps -ef | grep apache | wc -l

If the number goes beyong 100,an attacker closely watching your servers

4.Check your listening foriegn IPs

netstat -tn

You can see that the same IP or IPrange is listening on your Web port (80). If you made a DNS lookup to those IPs You can found that all those IPS are come from a DHCP pool,it means ATTACK.

MySQL Replication - A brief Note

Replication enables data from one MySQL database server (called the master) to be replicated to one or more MySQL database servers (slaves). Replication is asynchronous - your replication slaves do not need to be connected permanently to receive updates from the master, which means that updates can occur over long-distance connections and even temporary solutions such as a dial-up service. Depending on the configuration, you can replicate all databases, selected databases, or even selected tables within a database. With the help of Replication we can assure the scalability of Data. Because once the Master server went off-line,the slave will act as the master and start serving data. The Data will be replicated into slave server in a frequent intervals. Replication in MySQL features support for one-way, asynchronous replication, in which one server acts as the master, while one or more other servers act as slaves

The mail advantages of MySQL Replication are as follows

1.Scale-out solutions
spreading the load among multiple slaves to improve performance. In this environment, all writes and updates must take place on the master server. Reads, however, may take place on one or more slaves. This model can improve the performance of writes (since the master is dedicated to updates), while dramatically increasing read speed across an increasing number of slaves.

2.Data security
Because data is replicated to the slave, and the slave can pause the replication process, it is possible to run backup services on the slave without corrupting the corresponding master data.

3.Analytics
Live data can be created on the master, while the analysis of the information can take place on the slave without affecting the performance of the master.

4.Long-distance data distribution
If a branch office would like to work with a copy of your main data, you can use replication to create a local copy of the data for their use without requiring permanent access to the master.

Voice problem in Firefox Flash plugin

The latest version of Ubuntu is Hardy. Its a perfect desktop I have ever seen. Some times you may face a problem hearing sound in FLASH player of Firefox. I am telling here how to solve it. Most of the case its due to missing of a library file of adobe flash player

Infrastructure
OS :Ubuntu 8.04
Browser : Firefox 3

apt-get install libflashsupport

Restart the Firefox and enjoy the Sound

Sep 18, 2008

Wireless Internet in Ubuntu Hardy

People think getting wireless connectivity in LINUX is a difficult task. That is not right always It takes some times to configure. Because there is a one button click environment is not available nowadays. So we need some more steps to get it working. Also I am preparing a Script to do this automatically.

Scenario
To get wireless internet through DLINK access point in the ubuntu 8.04

Infrastructure

Machine : Acer Aspire 4715Z NWXMI-Pentium dual core-T2310
OS : Ubuntu 8.04
Wireless card : Atheros

1.First of all check your BIT version of OS

getconf LONG_BIT


2.Check the Manufacture of your wireless car

lspci | grep wireless

3.Lets install the Drivers for Atheros Card . Download the ndiswrapper source code and AR5007EG Windows drivers

http://wifix.sourceforge.net/software.php?title=ndiswrapper

4.Download the AR5007EG Windows XP drivers,If you're using a 32-bit version of Linux, use this command

wget http://blakecmartin.googlepages.com/ar5007eg-32-0.2.tar.gz

5.Extract the archieves

tar xvf ar5007eg-*.tar.gz
tar xvf ndiswrapper-newest.tar.gz

6.Ensure you have your kernel headers and the build essential package.

aptitude update && sudo aptitude install linux-headers-$(uname -r) build-essential

7.Blacklist the ath_pci kernel module (it doesn't support our chipset).

echo "blacklist ath_pci" | sudo tee -a /etc/modprobe.d/blacklist

8.Compile Ndiswrapper

pushd ndiswrapper-*/
sudo make uninstall
make
sudo make install
popd

9.Install the Windows drivers (using ndiswrapper).

pushd */ar5007eg/
sudo ndiswrapper -i net5211.inf
popd

10.Make sure Ndiswrapper up and running everytime OS starts

sudo modprobe ndiswrapper
echo "ndiswrapper" | sudo tee -a /etc/modules

11.Just Reboot the Laptop
/sbin/shutdown -r now

You will get a NETWORK icon in the right top panel. Click on the ICON and search for available access point.
EnjoY WirelesS InterneT.

Sep 15, 2008

Prevent DoS attack in Linux using IPTABLES

A major problem facing by mail server admin is DOS (Deniel Of Service) attack. Hackers will try to mess up with the most popular ports of a UNIX/LINUX machines. We can prevent this my writing an IPTABLE rule in the server. The working is ,if some one is trying make connection continuously through a specified port the rule will block the IPADDRESS permanently. Here I am stating the securing of PORT 25 (SMTP) here you can use your own

iptables -I INPUT -p tcp --dport 25 -i eth0 -m state --state NEW -m recent --set

iptables -I INPUT -p tcp --dport 25 -i eth0 -m state --state NEW -m recent --update --seconds 60 --hitcount 4 -j DROP


This will Block all the IP ADDRESS which will make connection to port 25 continuously within ie 4 SMTP connection within 60 seconds. You can change PORT,INTERVALs here.

We can also log these ips as well and use for future purpose for example,if you would like to add these logged IP to TCPWRAPPER etc.
Do the following.

Firts of all Set your Log Daemon to log the IPTABLES

# vi /etc/syslog.conf

Add the following line at the end of the file

#kern.warning /var/log/iptables.log
#touch /var/log/iptables.log

Restart the System Log Service

#/etc/init.d/syslog restart (On Redhat based,Centos)

iptables -A INPUT -j LOG --log-level 4

iptables -I INPUT -p tcp --dport 25 -i eth0 -m state --state NEW -m recent --set

iptables -I INPUT -p tcp --dport 25 -i eth0 -m state --state NEW -m recent --update --seconds 60 --hitcount 4 -j DROP --log-prefix '** HACKERS **'--log-level 4

PERFECT. THE HACKERS ARE BEING LOGGED NOW !!!.

The next stage is to add these logged ips to TCPWRAPPER (/etc/hosts.deny).

#/bin/cat /var/log/iptables.log | awk '{print $9}' | cut -f2 -d "=" >> /root/badip.txt

The above line will grep the SOURCE ip from the log and append to badip.txt

Next Run this command as a frequent interval with the help of CRON

#vi /etc/crontab

*/1 * * * * root /bin/cat /var/log/iptables.log | awk '{print $9}' | cut -f2 -d "=" >> /root/badip.txt

Here the script will run in every minutes. The file will be grow up rapidly to heavy size if your server have heavy traffic. So CleanUP the file in a frequent intervals. Better setup another CRON for it.

Next to add these IPs in the hosts.deny file

#vi /etc/hosts.deny
SSHD:/root/badip.txt

So things are clear. The first CRON job will update the file badip.txt list, as well as it will blocked by TCPWRAPPER.

Jun 18, 2008

Restrict Access With Apache

In this document I hereby explain how to restrict access to a specified Directory in Apache.

My infrastructure is
FC9
Apache 2.2.6

For this example let’s say I want to protect a directory called private. Although your files may be in other locations, my files are located here:

Directory to protect: /var/www/htdocs/private
httpd.conf: /etc/apache/conf/httpd.conf

The very first thing to do is create an .htaccess file with following details right in the Directory
[root@server ] touch /var/www/htdocs/private/.htaccess
[root@server ] vi /var/www/htdocs/private/.htaccess

AuthType Basic
AuthUserFile /var/www/conf/.htpasswd
AuthName RestrictedArea
require valid-user
satisfy any

Here the .htpasswd file is storing the user name and password of authenticated users. You can specify this file any where in the directory.
Change its ownership and permissions

[root@server ]chown apache.apache /var/www/conf/.htpasswd
[root@server ]chmod 644 /var/www/conf/.htpasswd

Next lets add this following content in the httpd.conf file. Put the following content in the Directory Tag

[root@server]vi /etc/httpd/conf/httpd.conf


deny from all
Options ExecCGI
AllowOverride AuthConfig
Order deny,allow


Save and Exit

Now Lets add some users in the .htpasswd files


[root@server]htpasswd –bc /var/www/conf/.htpasswd admin passwd

OK,Now lets restart the Apache

[root@server]apachectl -k graceful

Check the Web server ports are listening.

[root@server]netstat -ntlp

If the 80 port is listening go to your favourite web browser and type the address. It will ask for user name and password to check in.Other wise you will get an internal server error. You may miss something. Check with your server logs.

Jun 11, 2008

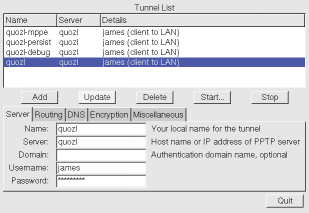
Point-to-Point Tunneling Protocol in FC9 How-To

This article describe about how to setup a MPPE in Fedora 9.PPTP is used to connect a remote local network using Virtual Private Network. You can use this article in a COPY-PASTE method. It works fine for me. If you found any difficult while doing this,feel free to contact me

System Requirements

1.Kernel 2.6.15 or Later.

install MPPE capability:

MPPE is Microsoft Point-To-Point Encryption, and is described in RFC3078. You will need to install it if your PPTP Server requires it, and if your kernel is before 2.6.15. Microsoft Windows VPN Server requires MPPE. If you do not require MPPE, skip this step.

If you can upgrade to 2.6.15 or later, do so, then skip the remainder of this step.


1.Install the kernel-devel package for your kernel (or kernel-smp-devel if you are running an SMP kernel), for example:

# yum install kernel-devel

2.Check that your system is running the kernel corresponding to the package requested in the previous step. Use the uname command to display the version of the running kernel, for example:

# uname -r

If the version shown is not the version installed in the previous step, reboot into that kernel. Otherwise the dkms build below may fail, because the kernel package for the current kernel may not be installed.


3. install the dkms package:

# yum install dkms

4. download the kernel_ppp_mppe dkms rpm and install it:

# rpm --install kernel_ppp_mppe-1.0.2-3dkms.noarch.rpm

5. test that the MPPE module loads on request:

# modprobe ppp-compress-18 && echo success

Note: this may fail if the ppp_generic module was already loaded when the kernel_ppp_mppe package was installed, as the original module is replaced on disk but not in memory. Check this by unloading the module, e.g. using "rmmod ppp_generic" or rebooting. Then repeat the modprobe.

# download the PPTP client program pptp rpm and install it like this:

# rpm --install pptp-1.7.0-1.i386.rpm

Note: alternatively we've been told that you can get it from Fedora Extras, like this:

# yum install pptp

# verify that you have dependencies installed for the packages in the next step; (usually this is only a problem if you did a custom install):

# yum install libxml libglade

These packages are also available on the distribution media.

# download the configuration program interpreter php-pcntl rpm install it like this:

# rpm --install php-pcntl-4.4.0-1.i386.rpm

# download the configuration program GTK+ interface php-gtk-pcntl rpm (mirror link) and install it like this:

# rpm --install php-gtk-pcntl-1.0.2-1.i386.rpm

# download the configuration program pptpconfig rpm and install it like this:

# rpm --install pptpconfig-20040722-6.noarch.rpm

Configuration

  • obtain from your PPTP Server administrator:

    • the IP address or host name of the server,
    • the authentication domain name, (e.g. WORKGROUP),
    • the username you are to use,
    • the password you are to use,
    • whether encryption is required.

  • run pptpconfig as root, and a window should appear,

  • enter the server, domain, username and password into the Server tab,

  • if you decided in Installation step 1 above that you would need MPPE, and if your administrator says encryption is required, then on the Encryption tab, click on Require Microsoft Point-to-Point Encryption (MPPE),

  • click on Add, and the tunnel will appear in the list,

  • click on the tunnel to select it, click on Start, and a window will appear with the tunnel connection log and status,


  • May 30, 2008

    Mail sending from EC2 using Postfix.

    One of the main problem I found in the EC2 is to sending mail to outside world. Some mail servers like YAHOO and HOTMAIL will block all the orphan mails from EC2 as SPAM. So people cannot send mail like CustomerVerification,NewsLetter from EC2 comfortably.So I am hereby stating an alternate method which was experimented by Paul to get out of this problem. This is sending mails using POSTFIX

    Scenario
    1.Amazon EC2
    2.Customised AMI from FC4

    HowTo

    1.Stop Sendmail
    #/etc/init.d/sendmail stop
    #chkconfig --levels 2345 sendmail off

    2.Installing Postfix
    #yum -y install postfix

    3.Editing the /etc/postfix/main.cf
    #vi /etc/postfix/main.cf

    myhostname = www.YOURDOMAIN.com
    mydomain = YOURDOMAIN.com
    myorigin = $mydomain

    smtpd_banner = $myhostname ESMTP $mail_name
    biff = no
    append_dot_mydomain = no

    alias_maps = hash:/etc/aliases
    alias_database = hash:/etc/aliases
    mydestination = localdomain, localhost, localhost.localdomain, localhost
    mynetworks = 127.0.0.0/8
    mailbox_size_limit = 0
    recipient_delimiter = +

    # SECURITY NOTE: Listening on all interfaces. Make sure your firewall is
    # configured correctly
    inet_interfaces = all

    relayhost = [mail.authsmtp.com]
    smtp_connection_cache_destinations = mail.authsmtp.com
    smtp_sasl_auth_enable = yes
    smtp_sasl_password_maps = static:YOUR_AUTHSMPT_USER_ID:YOUR_AUTHSMTP_PW
    smtp_sasl_security_options = noanonymous

    default_destination_concurrency_limit = 4

    soft_bounce = yes

    4.Save and Exit
    5.Start the Postfix
    #/etc/init.d/postfix start
    6.Check whether master is listening or not
    #ps -ef | grep master

    Enjoy Mailing from EC2 without trouble

    May 29, 2008

    How a DNS works - Simple Example


    • A User opens a web browser and tries to connect to www.google.com. The operating system not knowing the IP Address for www.google.com, asks the ISP's DNS Server for this information.
    • The ISP's DNS Server does not know this information, so it connects to a Root Server to find out what name server, running somewhere in the world, to know the information about google.com.
    • The Root Server tells the ISP's DNS Server to contact a particular name server that knows the information about google.com.
    • The ISP's DNS Server connects to Google's DNS server and asks for the IP Address for www.google.com.
    • Google's DNS Server responds to the ISP's DNS server with the appropriate IP Address.
    • The ISP's DNS Server tells the User's operating system the IP Address for google.com.
    • The operating system tells the Web Browser the IP Address for www.google.com.
    • The web browser connects and starts communication with www.google.com.
    Graphical Representation

    May 20, 2008

    Amazon S3. New definition in Storage

    Amazon S3 (Simple Storage Service) is an online storage web service offered by Amazon Web Services. Amazon S3 provides unlimited storage through a simple web services interface. Amazon launched S3, its first publicly-available web service, in the United States in March 2006 and in Europe in November 2007. Amazon charges fees for data stored and for bandwidth used in sending and receiving data. Amazon S3 uses the same scalable storage infrastructure that Amazon.com uses to run its own global e-commerce network.[citation needed Amazon S3 is reported to store more than 10 billion objects as of November 2007.[citation needed] Many small start-ups and enterprise clients use S3 as a web hosting service, image hosting service, back-up system, and more ...

    Amazon EC2. New Wave in Webhosting

    Amazon Elastic Compute Cloud, also known as "EC2", is a commercial web service which allows paying customers to rent computers to run computer applications on. EC2 allows scalable deployment of applications by providing a web services interface through which customers can request an arbitrary number of Virtual Machines, i.e. server instances, on which they can load any software of their choice. Current users are able to create, launch, and terminate server instances on demand, hence the term "elastic". The Amazon implementation allows server instances to be created in zones that are insulated from correlated failures. EC2 is one of several Web Services provided by Amazon.com under the blanket term Amazon Web Services (AWS).